The label on the jar looked fine when you stuck it on. You smoothed the corners, stepped back, and admired your work: crisp, black ink on a fresh white rectangle, announcing to the world that this was, in fact, “Smoked Paprika, 2024.” A small, satisfying act of order in a noisy life. And then, a month later, you opened that same cupboard and found the label had transformed into something else entirely—half peeled, letters smudged into a blurry fog, the “Paprika” now a ghostly gray smear. You hold the jar, squint, then laugh at yourself as you unscrew the lid and take a sniff just to be sure.
Why Most Labels Fail (And Why It’s Not Your Fault)
We tend to think of a label as a little sticker with some writing on it, but the truth is, every label is in a battle. It’s fighting heat, moisture, friction, and time. The pantry door slams. The soap bottle drips. The freezer door opens and closes, cycling from icy stillness to just-humid-enough to wreak havoc. That innocent rectangle of paper is outmatched—unless you quietly stack the odds in its favor.
Most of the time when labels fail, it’s not because you have “bad handwriting” or bought “cheap labels,” though both can play a role. It’s usually because the label was never matched to its environment. We slap any sticker on any surface, in any room, with any pen, then feel slightly betrayed when it fades away like a forgotten promise.
But when you start thinking like a label designer—even a little—you begin to see the patterns. Cold plus condensation? That’s a special kind of enemy. Sunlight and heat? Another. Greasy kitchen fingers? A third. The trick is to set each label up to survive the particular little world you’re about to send it into.
This isn’t about perfection or Pinterest-worthy pantries. It’s about the basic, low-key magic of being able to open a drawer, a freezer, a storage bin, and instantly know what’s inside without guesswork, sniff tests, or mystery cables. It’s about labels that don’t just exist—they stay readable.
Step One: Choose the Right Surface (The Secret Foundation)
Before you even touch a label, your real work starts with the thing you’re sticking it to. Every surface holds onto labels differently. Some grab and don’t let go; others shrug them off like an old sticker on a cold window.
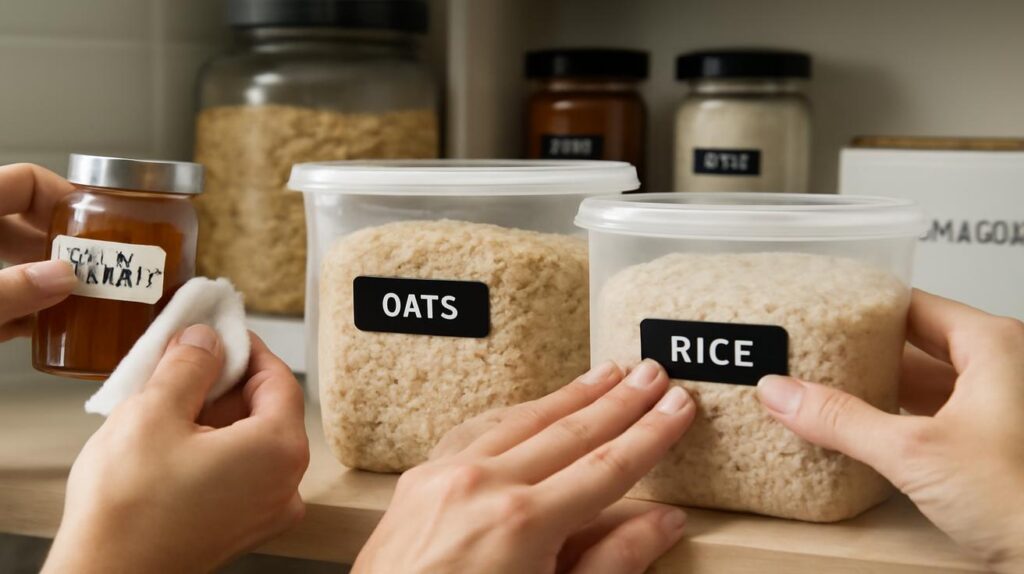
Glass jars are the dream. They’re smooth, non-porous, and forgiving. A good-quality adhesive label loves glass. So does painter’s tape, washi tape, and even masking tape, as long as you’re not demanding decades of loyalty. But that same little label will behave completely differently on a cloth bin, a silicone food container, or a waxy cardboard box.
The rule is simple: the smoother and cleaner the surface, the better the label will cling and the longer your words will stay readable. That means banishing invisible enemies first—dust, condensation, old sticker residue, oils from your fingers.
If you’re labeling kitchen jars, wipe them with a bit of glass cleaner or soapy water and dry them thoroughly. For plastic bins, make sure you’re not trying to stick anything to textured ridges or dusty patches. For cloth or fabric organizers, consider hanging tags or clip-on label holders instead of battling fuzz and fibers.
Just that small pause—asking, “Is this surface really ready?”—can stretch a label’s life from weeks to years.
Ink, Pens, and the Art of Staying Legible
Now comes the satisfying part: actually writing the thing. But not all ink is created equal. The pen you grab out of habit might be quietly plotting against your future self.
Water-based ink—like regular school markers or gel pens—has a tendency to blur, feather, or fade, especially in humid spaces like bathrooms, laundry rooms, or near the kitchen sink. Ballpoint pens fare a bit better, but even they can skip or fade on glossy label surfaces. And pencil? Lovely for sketching, less ideal for something that will bump against other containers for months.
The hero here is the permanent marker—specifically, a fine or ultra-fine tip, not the giant squeaky ones that bleed like crime scenes on paper. Permanent markers designed for archival use or for labeling plastic and glass are even better. They dry quickly, bond with the surface, and resist smudging when your fingers are damp.
There’s also the matter of contrast. A label is only as readable as its light–dark difference. Dark ink on a pale background is king. Pale metallic markers on dark backgrounds can look gorgeous, but they’re often harder to read at a glance, especially in dim spaces like closets or basements. If your goal is clarity over aesthetics, choose stark, simple contrast: black on white, navy on pale, bold on light.
And then there’s size. If you have to lean in and squint, the label has already failed. Write bigger than you think you should. Give each letter room. Your future self—arms full of groceries, kids asking questions, dog barking—will be grateful.
The Right Label for the Right Place
Standing in the kitchen or the garage, it’s easy to forget how different the “climates” of our homes really are. A label in a freezer is living a completely different life than a label on a shelf of craft supplies. The place dictates the material.
Think about a freezer for a moment. The labels you put there are going into a land of frost and condensation. Anything made of standard paper with water-based adhesive is going to curl, wave, or surrender entirely. The ink may freeze and then run the moment condensation appears.
Freezers prefer plastic-based labels with strong, cold-resistant adhesive and permanent ink. If you don’t have specialized freezer labels, you can hack the problem with simple masking tape plus a permanent marker—but then add an outer layer of clear tape over the writing, like a tiny laminate shield. It may not be pretty, but it’s fiercely practical.
Compare that with the bathroom. Here, you have moisture, steam, cleaning products, and constant handling. Bottles get wet. Hands get soapy. Labels that live here need water-resistant backing and smudge-proof ink. Waterproof labels, vinyl stickers, or even simple plastic label tape from a label maker perform beautifully. Again, a clear piece of tape over your handwritten note can turn an ordinary label into a miniature warrior against moisture.
The garage or shed introduces a different twist: dust, rough handling, temperature swings. For storage bins, consider larger labels with bold, thick writing. You want something readable from a distance, not a delicate script you have to lean in to decipher while balancing on a step stool.
Here’s a quick little pocket guide to help you think it through:
| Where You’re Labeling | Best Label Type | Recommended Writing Tool |
|---|---|---|
| Freezer containers | Plastic or freezer-safe labels; masking tape + clear tape | Fine-tip permanent marker |
| Pantry jars & cans | Paper or vinyl labels on clean, dry surfaces | Permanent marker or bold ballpoint |
| Bathroom bottles | Waterproof or vinyl labels; label-maker tape | Waterproof permanent marker |
| Garage & storage bins | Large adhesive labels; tag-style labels for rough surfaces | Thick permanent marker, big bold lettering |
| Cloth baskets & fabric bins | Hang tags, clip-on label holders, or sewn-in tags | Permanent marker or printed insert |
Making Labels That Survive Real Life
Even the best materials can be undone by tiny, human habits. We grab jars with wet hands. We slide bins across shelves, scraping labels against wood and plastic. We stack containers so the edges rub and corners lift. The battle for readability is fought just as much in these small frictions as in the ink and paper.
One gentle fix: think about where on the object your label lives. If you always grab a jar around the middle, try placing the label a bit higher, where fingers don’t constantly rub. On storage bins, choose the flattest, least-scraped area, often the front face rather than the top. With file folders or notebooks, place labels where they won’t be bent at the seam or corner.
If you know an item is going to be handled often, or live in a rough-and-tumble spot like a busy pantry, layering is your friend. Label first; then protect. Clear packing tape, transparent contact paper, or a small self-adhesive laminating sheet can shield your writing. You turn a fragile paper sticker into something closer to a weather-proof sign.
For items like lunch containers or kids’ water bottles that are constantly washed, bumped, and flung into backpacks, consider specialized dishwasher-safe labels or etched name tags. But even then, that simple trick—writing bold, high-contrast words and covering them with clear tape—goes surprisingly far.
There’s also the question of what you actually put on the label. Overly detailed descriptions that force you to write tiny letters will become smudged mysteries fast. Keep it short and strong: “Chickpeas, cooked, Feb 2026.” “Tax Docs 2024–2025.” “Craft Paints – Warm Colors.” Enough information to make sense, not so much that you compress your writing into oblivion.
Thinking Ahead: Dates, Systems, and Future You
Imagine pulling a container out of the freezer. It says “Soup.” Helpful, yes, but not quite enough. What kind of soup? And when did it get in there? The label is technically readable, but not actually useful. The more you think about your future self rifling through shelves and boxes, the more strategic your labels become.
Dates are one of the most powerful bits of information you can add. They’re especially critical on anything perishable—food in the freezer, DIY cleaning solutions, beauty products, or seasonal gear. Write the date clearly, in a consistent format, so your eye learns to spot it instantly. “2026-03-01” jumps out far faster than “March 1st, 2026” scrawled in the corner.
Another small, satisfying upgrade is adopting simple naming patterns. All your winter clothes bins might start with “Winter –” followed by the category: “Winter – Hats & Gloves,” “Winter – Sweaters,” and so on. Craft drawers might begin with “Craft –” and then the specific contents. This turns your home into a quiet, flexible system rather than a patchwork of one-off labels.
You can even set a mental “expiration” date for certain labels. A strip of washi tape or removable label might signal something temporary, like leftovers or a project in progress. A heavy-duty plastic label or engraved tag might mean “this is how this drawer is staying for the long haul.” The material and placement of the label become part of its message.
Most people underestimate how much stress and decision fatigue vanish when labels are both readable and thoughtfully planned. You no longer waste mental energy or time decoding your own handwriting or rummaging through bins. The label quietly does its job so you can get on with yours.
When Digital Meets Physical: Blending Old and New
There’s a strange pleasure in a handwritten label—your own letters curling across a jar or a box. But there’s no law that says analog and digital can’t work together. In fact, when they do, labels become more powerful without losing their human feel.
A basic label maker is often the gateway. Neat, uniform text; sticky-backed plastic tape that resists smudges; the satisfying little whir as it prints. For things that get reorganized often—tool drawers, chargers, office supplies—it can be a relief to know that re-labeling won’t involve your handwriting mood that day.
Beyond that, some people quietly number their labels and keep a simple list somewhere else. A box might say “Photos Box 3,” and a digital note or spreadsheet holds the detail: “Photos Box 3 – Family trips 2010–2015.” That way, the physical label only needs to stay very simple and readable, while the richer information lives in a place where you can search and edit without peeling anything off.
You can borrow this trick without getting elaborate. Write a small code or short label that makes sense to you—“Bin A,” “Bin B,” “Kitchen-1”—and then note their contents in a notebook or notes app. The label on the bin stays readable for years, even as the detailed list of what’s inside may change over time.
In the end, the test of a good label isn’t whether it’s pretty enough for a photo. It’s whether, months or years from now, you can walk up to a shelf, glance once, and know exactly what you’re looking at. It’s the small sigh of relief when your hand lands on the right thing the first time.
Frequently Asked Questions
How do I keep labels from peeling off in the freezer?
Use freezer-safe or plastic labels with strong adhesive, and always apply them to a dry, room-temperature surface before freezing. If you only have masking tape, write on it with a permanent marker, then seal over it with clear tape to protect both the tape and the writing.
What’s the best pen or marker for labels?
A fine- or ultra-fine-tip permanent marker is the most reliable choice. It bonds to many surfaces, resists smudging, and stays readable longer than water-based markers or gel pens, especially in humid or high-use areas.
How can I label cloth or fabric bins so it stays readable?
Instead of sticking labels directly to fabric, use hang tags, clip-on label holders, or small plastic sleeves attached to the bin. Write clearly on a card or paper inside the holder with permanent marker, so the label can be updated without damaging the fabric.
My kitchen labels keep getting greasy and smudged. What should I do?
Place labels higher on jars and bottles, away from where your hands usually grip. After writing on the label with a permanent marker, cover it with clear tape or a small laminating sheet to protect it from grease, steam, and wiping.
Is there a quick way to label things temporarily without making a mess?
Yes. Use washi tape or painter’s tape and write on it with a permanent marker. These tapes are easy to remove and leave minimal residue, making them ideal for short-term projects, leftovers, or evolving storage systems.